
You can customize your products with additional information and/or configurable options (which affect product price) by editing your functions.php file within your WordPress site. In this article I’ll show you how with useful examples and code you can copy to your own WordPress site.
Table of Contents
- What can you do with custom fields?
- What is the ‘checkout process’?
- Adding the customer Fields across all areas of the ‘Checkout process’
- Adding custom fields to the productMaking sure to save these custom fieldsDisplaying custom fields in appropriate places across the checkout processMaking custom fields ‘required’ fieldsAdding the custom data to the cart
- Option 1: Non price affecting custom fieldOption 2: Price affecting custom fieldContinuing to add custom fields to the cart
- Adding custom fields to the productMaking sure to save these custom fieldsDisplaying custom fields in appropriate places across the checkout processMaking custom fields ‘required’ fieldsAdding the custom data to the cart
- Learn to customize WooCommerce Fully with an online Udemy course
What can you do with custom fields?
In WooCommerce, Custom Fields are often used to add additional info to the WooCommerce Product and Order Process in general. Some examples might be,
- Additional attributes or characteristics of a product which WooCommerce doesn’t automatically allow you to add but you want the customer to se able to see on the specific product page.
- For eg, a cell phone might have various specific characteristics like memory size, processor, camera mega pixels etc which you may want to have shown to the user and throughout the checkout process and WooCommerce won’t necessarily allow you to show these out of the box.
- Additional configurable options on products which change the cost of that product. For eg, buying a cell phone online might mean choosing between different size of processors, memory sizes etc which also alter the cost of the product for the user.
- In our example of a cell phone it might have configurable options like variable memory size and camera mega pixels which when the user chooses from the available options these different configurations may change the final price of the product.
- In addition to these uses you will also want to add any of these additional pieces of information to the rest of the checkout process from the product page, the cart, the checkout all the way to the order and the emails in which are sent after an order that allow us.
What is the ‘checkout process’?
The ‘checkout process’ in this tutorial just refers to the set of pages in between a customer selecting a product, adding it to the cart and checkout pages as well as the order and the emails sent to the customer and admin users after the sale.
If you are adding info to the product then you will also want to display that appropriately not only on the product pages but also on the cart and checkout pages so the user can review their product correctly in the cart and checkout as they progress. After paying this data will need to be added to the Order object itself and any emails which get sent out afterwards.
Adding the customer Fields across all areas of the ‘Checkout process’
Adding custom fields to the product
In either case, if you want to add extra info to the product or if you want to user to be able to alter the product configuration based on various options (see section above for examples of what these could be), you will want to add some version of the below code to your functions.php at https://yoursite.com/wp-content/themes/yourtheme/functions.php.
PROTIP: Changing from allowing configurable options to just displaying info can be done further down in the tutorial by changing the HTML that you display the custom field with as well as saving and adding them to the rest of the checkout process as appropriate.
NOTE: You will want to replace some of the below info to your specific case but read below for more info.
function newCustomFieldOnProduct() {
    $args = array(
        'id' => 'idName',
        'label' => __( 'Your label here', 'idName' ),
        'class' => 'yourClassName'
    );
    woocommerce_wp_text_input( $args );
}
add_action( 'woocommerce_product_options_general_product_data', 'newCustomFieldOnProduct' );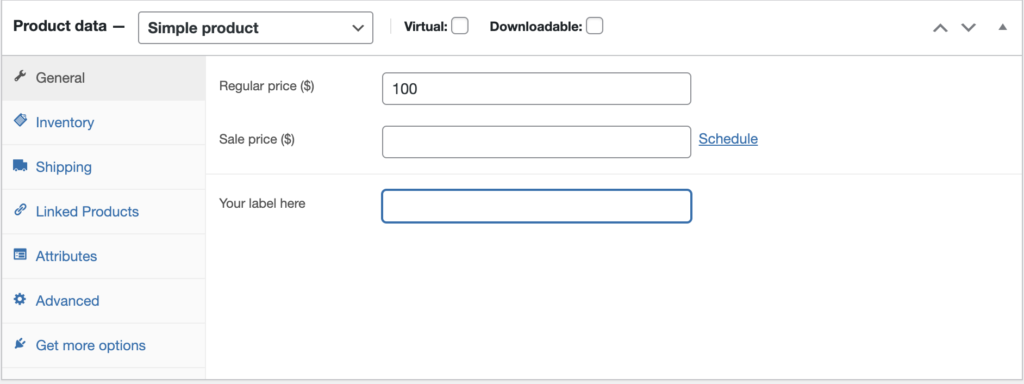
To explain what is going on here,
- This code is basically taking the hook, woocommerce_product_options_general_product_data(), and adding a text field to it which you can fill out.
- You can see this on the product specific page by scrolling down to the ‘Product Data’ area of the page and looking on the General Settings’ tab.
- You could add it to the other tabs here by replacing woocommerce_product_options_general_product_data() hook with either the
woocommerce_product_options_inventory_product_data() orwoocommerce_product_options_shipping() hooks which enable you to add them to other tabs within the ‘Product Data’ tab. - You could also change the field this adds to be a checkbox, hidden field or textbox by changing the woocommerce_wp_text_input() to either
woocommerce_wp_hidden_input(),woocommerce_wp_textarea_input() orwoocommerce_wp_checkbox(). - Obviously you can also alter the class and id attributes of the input field and the placeholder and title text by adjusting the code above also.
Making sure to save these custom fields
The custom field you added above will also need to be saved when the product is saved. In order to do so you can add the below code to your functions.php file.
NOTE: Make sure to alter the bolded fields below as matching the above code you added.
function saveCustomFields( $post_id ) {
    $product = wc_get_product( $post_id );
    $title = isset( $_POST['idName'] ) ? $_POST['idName'] : '';
    $product->update_meta_data( 'idName', sanitize_text_field( $title ) );
    $product->save();
}
add_action( 'woocommerce_process_product_meta', 'saveCustomFields' );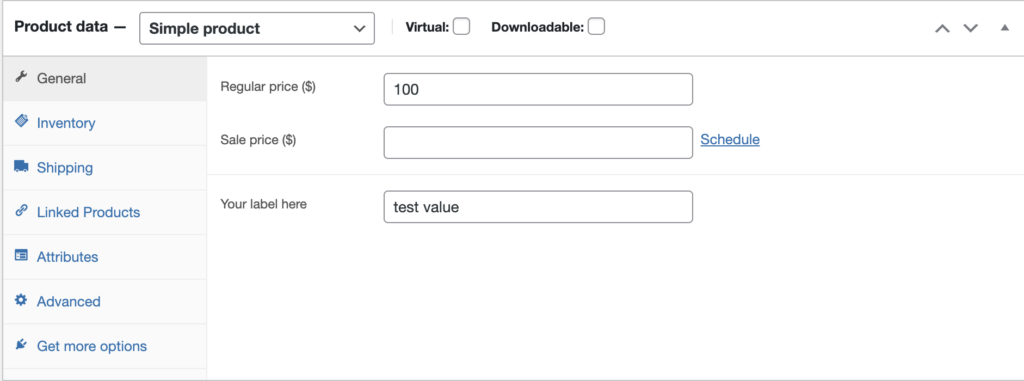
Displaying custom fields in appropriate places across the checkout process
By adding the below also to your functions.php you can display the new custom field on the product page itself.
It’s quite flexible as you can choose how you want the info to display, in a text field (if you want the user to add their own configurable info to the product) or indeed as an uneditable piece of HTML which can simply be printed out to the user.
function displayCustomFields() {
    global $post;
    $product = wc_get_product( $post->ID );
    $title = $product->get_meta( 'idName' );
    if( $title ) {
        printf(
            '<div class="custom-field-wrapper"><label for="title-field">Add custom Option</label><input type="text" id="idName" name="idName" value="%s"></div>',
            esc_html( $title )
        );
    }
}
add_action( 'woocommerce_before_add_to_cart_button', 'displayCustomFields' );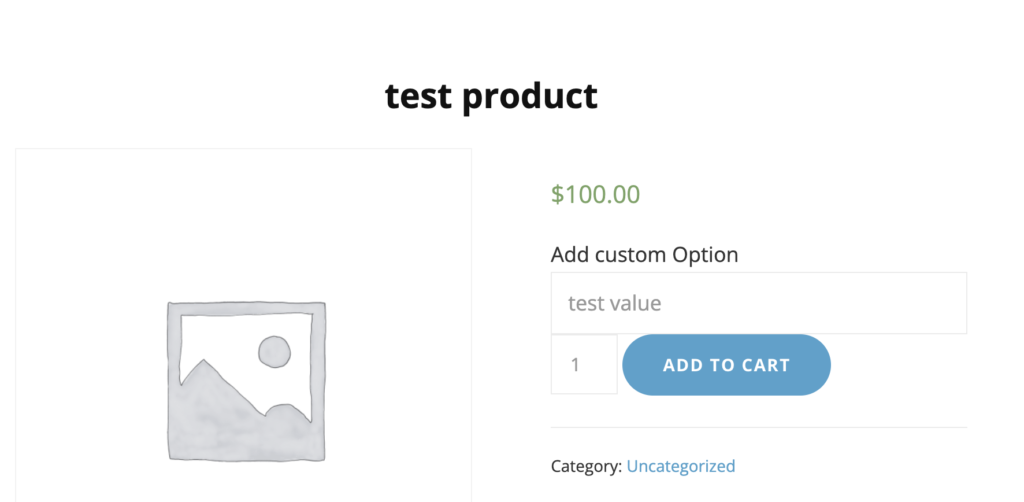
Making custom fields ‘required’ fields
On a product page, before a user can add the product to the cart, you may have some options which are ‘mandatory’ for the user to fill out. If so, you can make these fields required by adding the below code.
This is not mandatory to add but if you need the configurations to set the price or fulfill the order in general you should add it.
function validateCustomField( $passed, $product_id, $quantity ) {
    if( empty( $_POST['idName'] ) ) {
        // Fails validation
        $passed = false;
        wc_add_notice( __( 'Please enter a value into the text field', 'short' ), 'error' );
    }
    return $passed;
}
add_filter( 'woocommerce_add_to_cart_validation', 'validateCustomField', 10, 3 );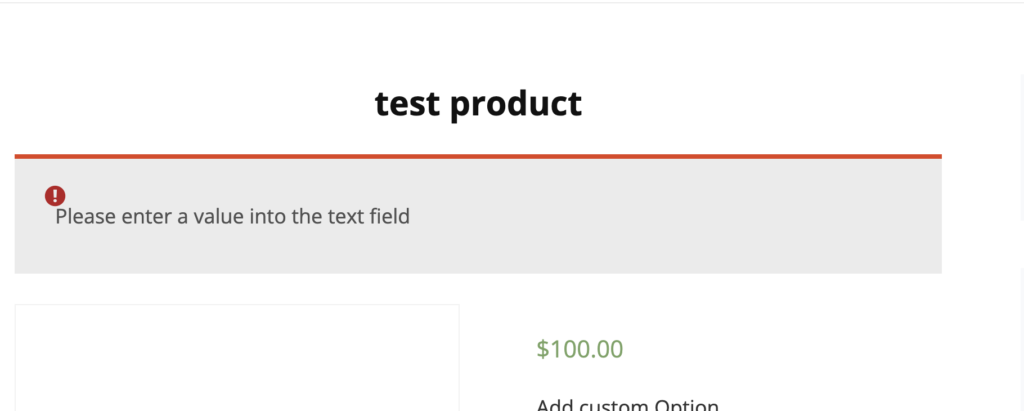
Adding the custom data to the cart
Option 1:
You can add this custom data to the cart where there is a list all the products the customer wants to add into their order. You can add the below to your functions.php in order to add the custom field info to the cart.
function addCustomFieldItemDataNoPriceChange( $cart_item_data, $product_id, $variation_id, $quantity ) {
    if( ! empty( $_POST['idName'] ) ) {
        // Add the item data
        $cart_item_data['title_field'] = $_POST['idName'];
    }
    return $cart_item_data;
}
add_filter( 'woocommerce_add_cart_item_data', 'addCustomFieldItemDataNoPriceChange', 10, 4 );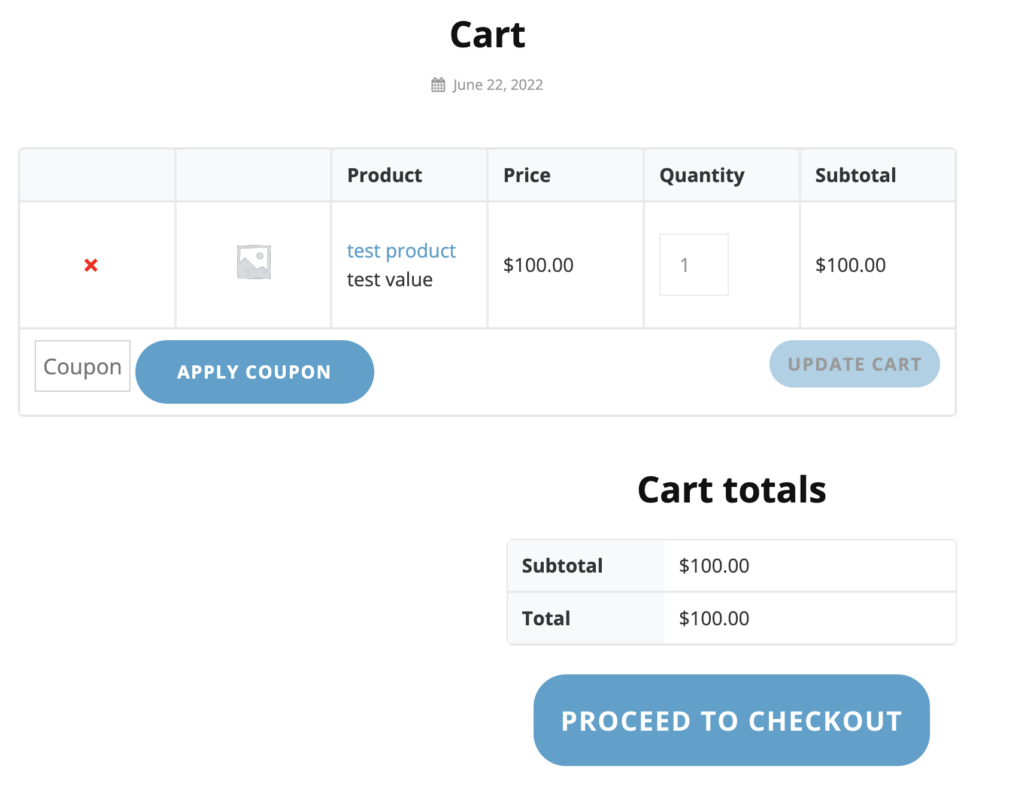
Option 2:
Use this option if you want to update prices based on your custom fields.
In some cases the options you add to the product will affect the price so you can add the below to allow the selections made by the user to alter the price automatically for checkout and payment.
NOTE: If you added the code above to add the custom field to the cart then the next set of code will replace this in your functions.php. This is because the cart lists the price and if your custom field affects price then you’ll need to alter it.
function addCustomFieldItemDataWithPriceChange( $cart_item_data, $product_id, $variation_id, $quantity ) {
	    if( ! empty( $_POST['idName'] ) ) {
	        $cart_item_data['title_field'] = $_POST['idName'];
	        $product = wc_get_product( $product_id );
	        $price = $product->get_price();
	        $cart_item_data['total_price'] = $price + 100;
	    }
	    return $cart_item_data;
	}
	add_filter( 'woocommerce_add_cart_item_data', 'addCustomFieldItemDataWithPriceChange', 10, 4 );

function beforeCalculateTotals( $cart_obj ) {
    if ( is_admin() && ! defined( 'DOING_AJAX' ) ) {
        return;
    }
    foreach( $cart_obj->get_cart() as $key=>$value ) {
        if( isset( $value['total_price'] ) ) {
            $price = $value['total_price'];
            $value['data']->set_price( ( $price ) );
        }
    }
}
add_action( 'woocommerce_before_calculate_totals', 'beforeCalculateTotals', 10, 1 );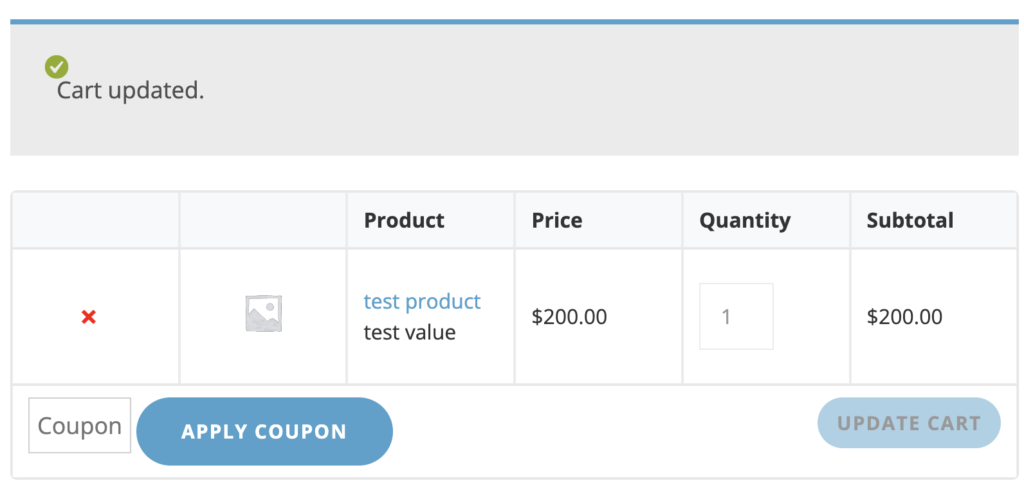
On the same cart page there will also be a ‘sub totals’ area. If you add the above code then the subtotals will also be updated to match the rest of the product table. The sub totals area will add all the products up to give a total to the user for the entire order.
Continuing to add custom fields to the cart:
No matter which option above you chose add the below also to your functions.php.
function cartItemName( $name, $cart_item, $cart_item_key ) {
    if( isset( $cart_item['title_field'] ) ) {
        $name .= sprintf(
            '<p>%s</p>',
            esc_html( $cart_item['title_field'] )
        );
    }
    return $name;
}
add_filter( 'woocommerce_cart_item_name', 'cartItemName', 10, 3 );
Adding custom fields to the WooCommerce Order and emails to customers and admin users
After the order is completed and paid for the user will be redirected to the ‘thank you’ page where a summary of the order will be shown. In addition you can add this info to the order in the CMS (viewable by admin users). You can add this info to the order with the below.
You will probably also want to add this information to the emails which get sent out to the customer and the admin users who are automatically alerted to the sale with an email. You can do that with the below.
function addCustomDataToOrder( $item, $cart_item_key, $values, $order ) {
    foreach( $item as $cart_item_key=>$values ) {
        if( isset( $values['title_field'] ) ) {
            $item->add_meta_data( __( 'Custom Field', 'short' ), $values['title_field'], true );
        }
    }
}
add_action( 'woocommerce_checkout_create_order_line_item', 'addCustomDataToOrder', 10, 4 );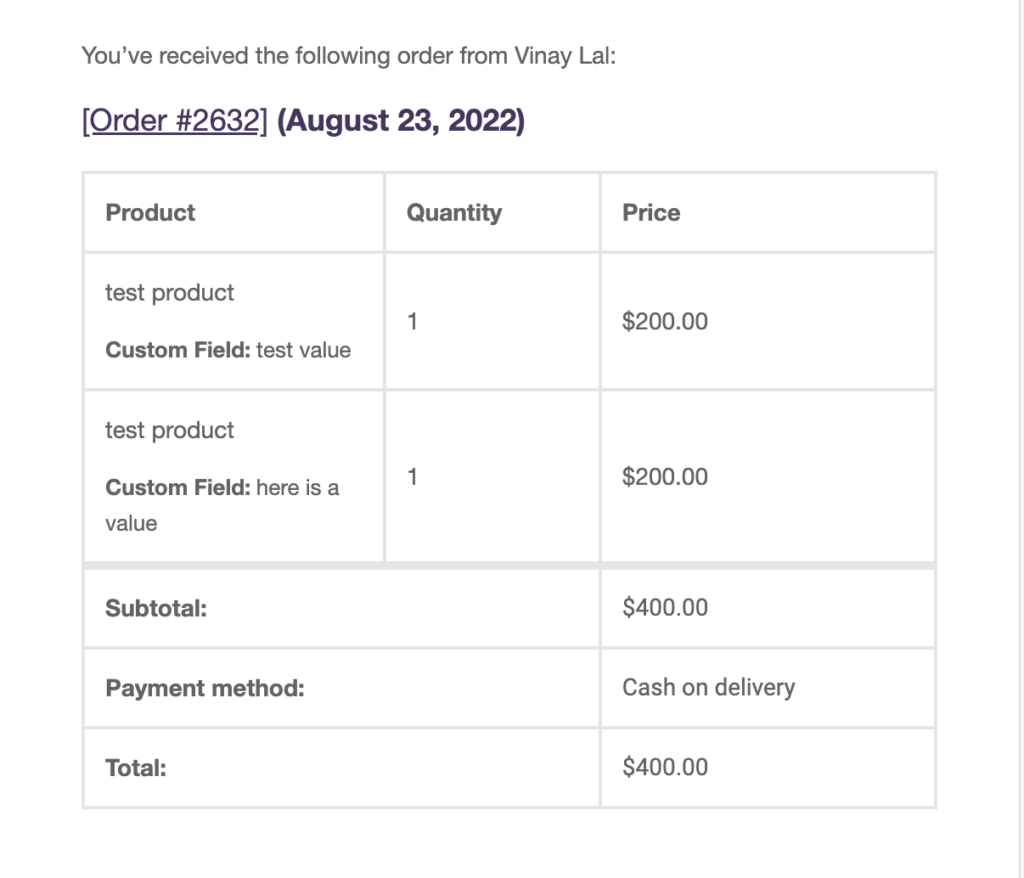
Learn to customize WooCommerce Fully with an online Udemy course
If you’d like to know more about how to customize WooCommerce completely check out these courses from Udemy which are low cost, online and have been completed by thousands of people.