
‘Add Product To Cart Via URL‘ is a plugin which allows you to add products to any users account by sending them a custom made URL. This plugin removes the need for users to scroll around your site finding and adding the particular products to their cart (time consuming) and proceeding to checkout.
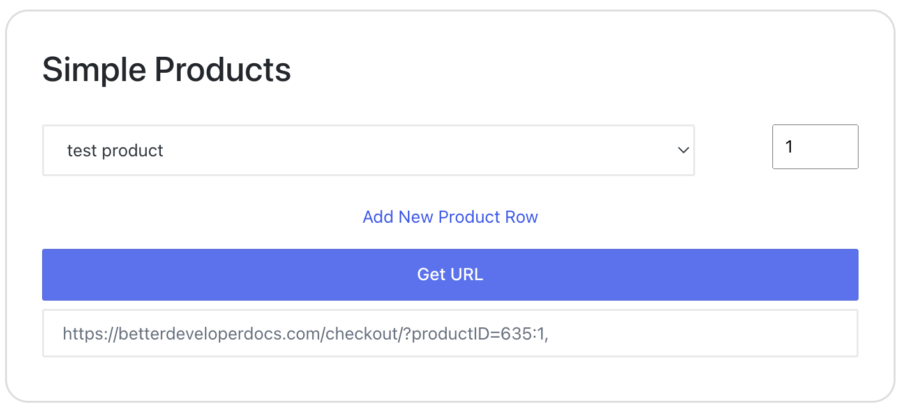
Your customer will click the URL (like this – https://yoursite.com/checkout/?productID=635:1,) perhaps from an email you have sent them or a social media campaign ad you are running and when the page is loaded the pre-selected products are added to the cart and the checkout page loaded ready for them to pay and enter delivery information. Let’s look more into how you can create these URLs.
It works like this,
- You will need to have WooCommerce installed and activated before proceeding. If not, do that first then carry on with the below instructions.
- Download the plugin files by clicking on the ‘Download’ button.
- Go to your WordPress backend (aka CMS) and go to the ‘add new plugin’ page.
- Then find the ‘Upload Plugin’ button at the top.
- Click it and add the downloaded plugin (.zip) file.
- Click install.
- Click Activate.
- Then create a new page – this will be the page where you create the links which you will copy and send to the customer you wish to buy the pre-selected products.
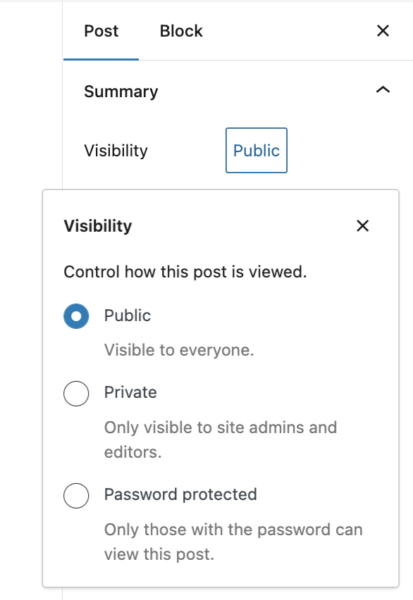
- Name this page appropriately. Only logged in users will have access to the page. If you would like to make this even more private then you can add a password to this page or post by viewing the ‘visibility’ tab on right hand side of screen in page editor. eg,
- Add the following shortcode to the page’s content,
- “[wc-cart-url-form]”
- Save the page.
- Now navigate to the front end version of the page, eg yoursite.com/the-name-of-the-page
- Now use the form presented to create a URL based on the products you select to be included in the URL. You will 3 different forms with which you can use to make URL’s.
- The first form will allow you to create URL’s for simple product(s) only. You can add as many simple products to this URL as you like by using the ‘Add New Product Row’ button.
- The second form will allow you to add grouped product(s). You can add only one grouped grouped product to a URL at this time.
- The third form will allow you to add variable product(s). You can add only one variable grouped product to a URL at this time.
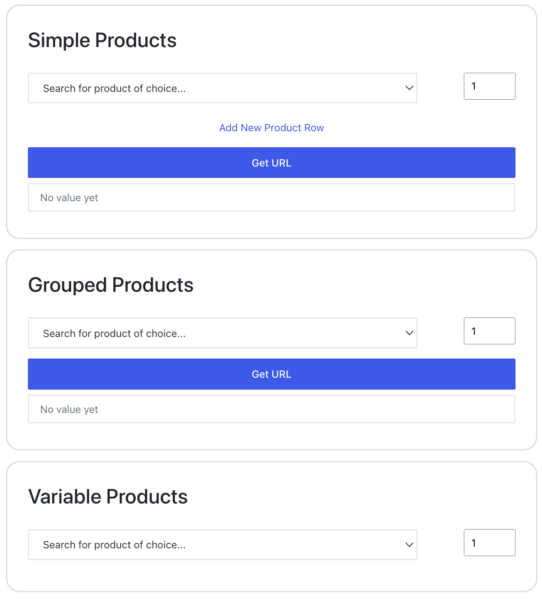
- In any of the 3 forms, once you have added all the products and quantities, hit the ‘Get URL’ button.
- Copy the contents of the input field shown below the ‘Get URL’ button.
- This is your link that you can either send to the customer or use in an HTML button as you desire.
- The user then needs to use the URL you have sent them. This could be achieved in several ways,
- You could send them this URL as it is in an email, whats app or text message as you desire.
- You could use it to create a link (using the URL as the href value) in an HTML email template or on your site,
- or you could include it as a link inside of your social media and advertising campaigns so that the user can directly add whatever product you are advertising.
- Once the customer has clicked on the URL in whatever way you are using it, the checkout page will load for your website along with the pre-selected products that you entered being automatically added to the users cart.
- If you want a different page to load and not the ‘checkout’ page you could change this part of the URL to be something else. For example,
- change https://yoursite.com/checkout/?productID=635:1,
- to this (replacing the bolded text with your own URL segment)
- https://yoursite.com/your-new-page/?productID=635:1,
- They can then proceed as normal through the checkout process and enter payment details and delivery instructions.