WooCommerce has its own test mode features but also I show you 3 tips with working with WooCommerce in a development environment like,
- using cash payments,
- setting PHP Globals to use to turn on/off code in a production vs development environment and
- how you can remove any risk of SEO penalties to your site when using test environments.
// Table of Contents
- Woocommerce’s Test Mode Features
- Cash as Payment to avoid Payment Gateways
- A DEV MODE using PHP Globals for Payment related functionality
- SEO and Development Sites
- Learn to customize WooCommerce Fully with an online Udemy course
// Woocommerce’s Test Mode Features
WooCommerce itself has some Testing features which can be useful. Let’s look at two features.
Sites which temporarily should not process real transactions:
If you have a site which will eventually process live sales but at the moment is in some sort of testing mode then you can use WooCommerce’s built in Test Mode which can be turned on and off in your website’s CMS.
To enable test mode you will need to install the WooCommerce Payments Plugin first.
Step 1:
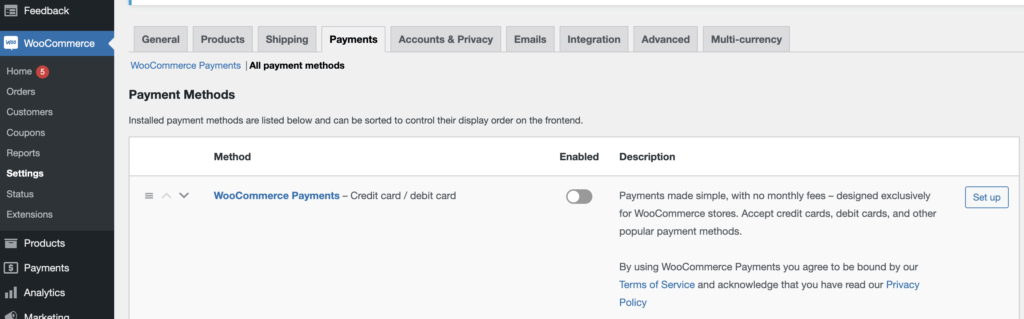
You can go to your CMS and in the left hand column find ‘WooCommerce’ –> ‘Settings’ –> ‘Payments’ and in the list of payment methods you will see ‘WooCommerce Payments’ and next to it an ‘install’ button.
Step 2:
NOTE: You also need to sign up to the service before progressing from this point. You will see the ‘setup’ button if you haven’t got an account yet.
Step 3:
Once installed and set up (as per note above) you can go go back to the Payments Tab of the WooCommerce Settings page in your CMS and refresh. Refresh it and you should see the ‘test Mode’ switch which you can turn on.
Step 4:
You’re all done at this point so, you can view the required Test Payment details on this URL which will allow you to enter specific fake (test) card details specific to your case like from a specific country or from a specific card issuer (Visa, MasterCard etc).
Sites which never need to process real transactions:
If your website does not need to process any transactions at all you can permanently place it into test mode by following the instructions here from WooCommerce. You will need to be able to edit your wp-config.php in the site files of your WordPress Site as well as login to your CMS. Editing the wp-config.php may be a developer level task if you are not familiar with how to do this.
This might be appropriate if you are demonstrating the processing of a transaction to admin staff or for training purposes.
// Cash as Payment to avoid Payment Gateways
A very quick alternative to WooCommerces Test Mode which may suffice in your situation is to turn on the ‘Cash on Delivery’ Payment method inside of ‘WooCommerce’ –> ‘Settings’ –> ‘Payments’.
This will allow you to create a sale in your WooCommerce site without having to enter any credit card details at all but will still process the order more or less as per normal. Personally, I have done this sometimes when I just want to make sure the ‘thank you’ page is being loaded correctly after an order is processed.
// A DEV MODE using PHP Globals for Payment related functionality
NOTE: The advice in this particular section assumes that you are developing on a different site than your production site. For example if your live site files are at https://livewebsitehere.com then I would often set up a separate but exact clone of the site at a subdomain on the same server at something like https://development.livewebsitehere.com.
NOTE: This would mean you can set the Global, as per below instructions, differently on each site and therefore have different functionality based on the PHP at each.
If you are a developer and want to associate some specific actions related to payments to your website then creating your own Environment Variables with PHP Global Variables could be helpful.
By way of an example, if you wanted an API to get utilized on every successful order (to liaise with your stock controller software) then you would not want this to happen for test transactions otherwise the live stock counts would be off.
In this case you could wrap this ‘API Code’ inside of a check for a Global PHP Variable as per below to make sure that it only happens when you have the site in ‘Test Mode’.
PROTIP: Develop site functionality on a completely different but exact copy of the live site such that I could be more thorough in my testing regime and not affect live clients. This also allowed me to work on the tasks within business hours while not affecting any of the customers user experience while they were shopping.
Step 1: Setting an Environment Variable
In the wp-config.php file you could create your own PHP Global like in the example below. A variable like this, once set, will be accessible from any PHP in your WordPress website.
You will need to set it differently on each site in order for this process to work properly.
DEFINE('ENVIRONMENT','PRODUCTION'); // this is the code which would run on your live site allowing the below code check to pass and your live version of code be executed

DEFINE('ENVIRONMENT','DEVELOPMENT'); // this would be the code you would define in the same file but on your development site so that your production code DOES NOT run on the test site
Step 2: Using it in your logic:
Now in your PHP code wherever you are writing your functionality which is related to a payment you can write do a logic check like this,
if(ENVIRONMENT == 'PRODUCTION'){

    // do your PRODUCTION ONLY code here

}elseif(ENVIRONMENT == 'DEVELOPMENT'){

    // do your DEVELOPMENT ONLY code here
}
SEO and Development Sites:
In the above advice I suggested that you could use a separate by cloned copy of your live site at a sub-domain on your server in order to code free from affecting your customers and while this is good practice you should be aware that there is some risk in doing this.
Potential risks:
- Google and other bots index your site resulting in your test sub domain and its pages being shown in search results. This could be seen as a ‘duplicate content’ issue negatively affecting your SEO. See below for a solution.
- This allows a greater ‘surface area’ for hackers who may want to exploit security holes on your website (all websites have security holes its about minimising the attack surface area so to speak). In this scenario there are two sites and if a bug is found in one of them then the hacker now has two sets of code to exploit instead of just one.
The solution to both of these risks:
You can add an .htaccess password which will stop both bots and hackers from freely roaming around what would otherwise be a largely public facing site.
This would present, to the user, a simple window like the below before even rendering a page on the site.
Step 1: Lets make a username and password:
You can do this very easily by going to this HTTPasswd Generator and entering some basic details for username and password.
These can be as secure as you like but are mainly to stop bots and hackers so I often just do a fairly simple version of each which I can remember.
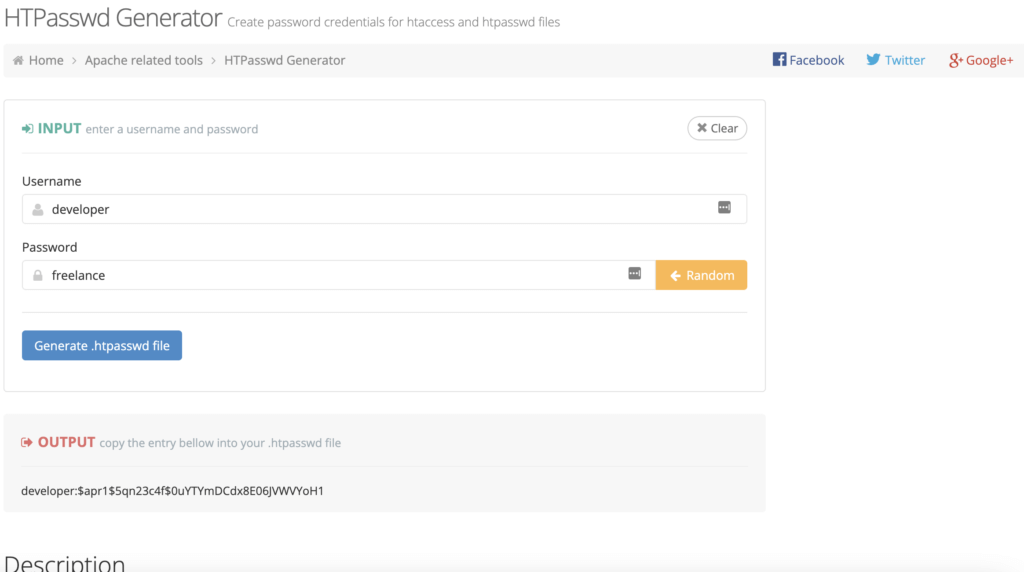
Copy the results from the above site which will look something like this:
“developer:$apr1$5qn23c4f$0uYTYmDCdx8E06JVWVYoH1“
Step 2: create a new file called ‘.htpasswd’ also at root level
At the root level of your site create a file called ‘.htpasswd’ and paste the output from HTTPasswd Generator into it with no spaces before or after.
Step 3: Find your htaccess file at the root level of your website
Then in your .htaccess file, also at root level, paste the below code at the top of it, alter the details to suit your site specifically and then hit save.
AuthName "Dialog prompt"
AuthType Basic
AuthUserFile /serverpath/development.livewebsitehere.com/.htpasswd
Require valid-user
NOTE: Before saving the above you will need to change the path to your particular installation. This can change based on the hosting company you are using so it may be best to check with them.
An alternative might be to navigate to the ‘cPanel’ –> ‘File System’ for your host and look in the top left corner which often displays the server file path when you navigate around the various files within your site.
NOTE: The server file path is not the same as the website URL but instead is the file path which is referenced by the URL. If in doubt as your server company to help you.
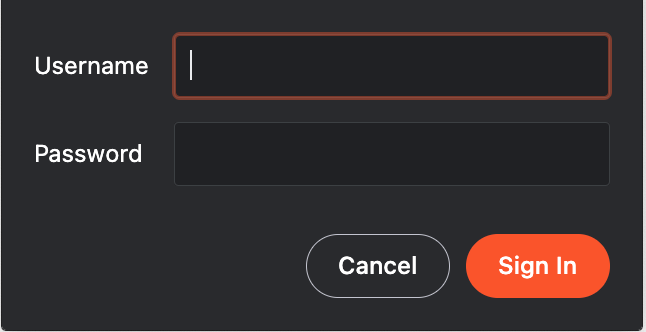
Once this is all done you will be prompted to enter the username and password before accessing the site. This will therefore be an additional login to any WordPress Login to access the CMS.
// Learn to customize WooCommerce Fully with an online Udemy course
If you’d like to know more about how to customize WooCommerce completely check out these courses from Udemy which are low cost, online and have been completed by thousands of people.