In this post we understand the specific API which is best to use with Frontity and a WooCommerce Store. We install the necessary plugins, set up a Frontity App on your local computer and connect it to your WooCommerce Site so we can start to pull out relevant product date to create a store in a Frontity Progressive Web App.
Table of Contents:
- What is Frontity in WordPress?
- Best way to execute WooCommerce in Frontity
- How do I use Frontity in WordPress?
What is Frontity in WordPress?
Frontity is the REACT equivalent of WordPress that allows you to convert WordPress to REACT with a headless CMS configuration. A headless CMS is a method of separating the backend code from the front end code which comprises a traditional website. Doing this has certain advantages in speed, security and user experience which we will discuss below but also has great ability with Search Engine Optimization (SEO) just like a traditional website.
Because of these advantages Frontity can be a very useful way to create a WooCommerce (e-commerce in WordPress) website with large amounts of products with no speed issues, great product SEO, and that has a great user experience on mobile devices and larger tablet and desktop devices. There are various ways to make a headless WooCommerce site but if you can code then Frontity is preferable.
Best way to execute WooCommerce in Frontity
Frontity is more or less a REACT based framework for WordPress (and therefore WooCommerce) that allows you to separate the front end (the head so to speak) from the backend and is hence headless. While this is true there are multiple API’s services with which you could execute this project.
- Use the WooCommerce API to communicate between the front and back end’s and where you need to build a custom endpoint then you write your own in your functions.php WordPress file. The problem you will face here is that the WC API only works if you are authorised to use it meaning a public, unknown user will not be able to access any part of your app which utilizes the WooCommerce App which is essential to the project so this won’t work.
- But times they are a changin’! WooCommerce in recent times has released a ‘Store API‘ which is the remedy to the above problem given that it is a public facing WC API which you don’t need authorisation for. If you like the idea of it the technical documentation can be found here.
- There is a better option in my opinion however, which is called co cart. It is made to make it easier for developers to do headless WooCommerce apps and can be considered even more detailed and useful than the WooCommerce’s Store API. In the rest of this guide I’m going to use Co Cart because I think it will eventually save you time and be more useful than WC’s Store API. You can read more about the benefits of Co Cart vs Store API.
- NOTE: Co Cart has a free and paid (PRO) product – you can read about Co Cart features and view prices.
How do I use Frontity in WordPress?
Installing necessary plugins
Now you know about the API’s involved (Co Cart in the rest of this tutorial series) lets install some plugins in order to proceed…
WooCommerce:
You might have already done this but if not go to your plugins installation area and search for WooCommerce. Hit, ‘install’ and ‘activate’. You will then be taken through some basic installation steps and answer some questions but this will take about 5 minutes.
You can install a plugin at the equivalent URL for your site similar to this: https://yoursiteurl.com/wp-admin/plugin-install.php
Depending on your particular project you might need other plugins like coupons or whatever but for the purposes of this tutorial we mostly just need the free base plugin WooCommerce.
Co Cart:
Also install Co Cart using the same URL as above. You will see a few different plugins for Co Cart. The free and base one is all you need for the purposes of this tutorial but you also might like to check out the other ones they have which might also come in handy. You’ll see them when you search for the base plugin called ‘Co Cart – Headless Ecommerce’.
At this point you have all the plugins you need to create a basic Headless WooCommerce Site but now we need to start creating a Frontity Project which will consume the Co Cart API and utilise the WordPress database.
How do I run a Frontity project?
Frontity’s different Architectures (you choose):
Frontity can be set up in either an ‘embedded‘ or ‘decoupled‘ mode. In this tutorial I’m going to use the decoupled mode which means that the code for Frontity does not reside within the same set of site files which comprises the WordPress site and can even sit on a completely different server if you like – it just depends on your particular project and what you prefer.
Frontity embedded mode is possible in your project also. This basically means that you can install Frontity code in the same set of files as comprise your WordPress site but this seems slower to me and also requires a caching plugin which may or may not be ok for your project. I don’t as this point really understand why someone would use this option but hey maybe it works for you. You can read more about ’embedded’ vs ‘decoupled’ mode here on the Frontity site also.
Steps to set up a decoupled Frontity Project:
Pre-requisites:
You can follow the official documentation here to install a new Frontity project or follow along with mine here.
You will need NODE JS installed on your computer which you can find here.
Step 1:
Navigate to the folder you want to install the project via your console or terminal and run this command.
npx frontity create hello-frontity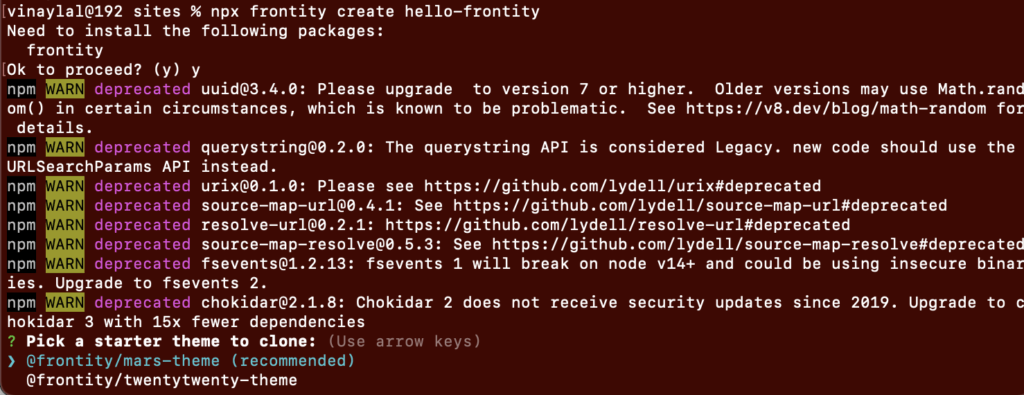
Make sure you select a theme from the set up process and then go make a cup of tea cos this will take a few minutes.
Step 2:
Now you can start the project up and star to mess with the code to execute a WooCommerce Store in our new headless CMS set up.
cd hello-frontity
npx frontity dev
Once you have run the last command a browser will open up and the front page of your Frontity site will be displayed at http://localhost:3000/. If this port is busy it will ask you if you want to run it on another one.
Step 3:
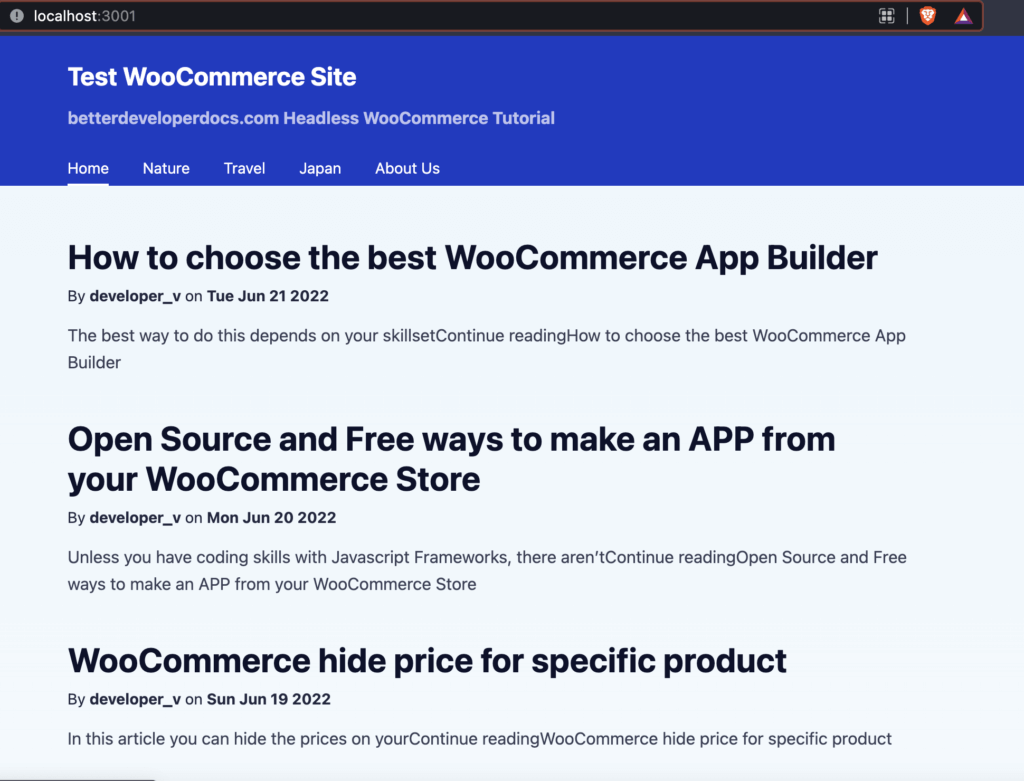
Now, let’s set up this Frontity site to connect to the site in which we want to replicate in Frontity and not the generic Frontity Test Site. In this example I’m going to use this website you’re on now to demonstrate (because it is also a WordPress site).
Go to your project directory… in my set up its something like /Users/yourusername/Documents/sites/hello-frontity and find the frontity.settings.js file.
Step 3.1:
Find the default code and replace it with the URL for your own site in which you are wanting to replicate.
// find the below code and replace it with whatever you want for your own project.
"state": {
    "frontity": {
      "url": "https://test.frontity.org",
      "title": "Test Frontity Blog",
      "description": "WordPress installation for Frontity development"
    }
  },
Step 3.2:
Also you need to replace the below code in order to get the new blog data to show up…
{
      "name": "@frontity/wp-source",
      "state": {
        "source": {
          "url": "https://test.frontity.org"
        }
      }
    }
Step 3.3:
Reload your local project site at something like http://localhost:3000/ and you should see that the blogs which are in your site are now being pulled and displayed in your Frontity Project.
Part 2: In the next post we will create a custom theme to house our WooCommerce Site:
So, our Frontity App is connected to our WordPress site however we should create a custom theme to present WooCommerce and other WordPress Data to our end users. By this I mean that fundamentally we will create a theme which has some WooCommerce related pages like shop, product, cart and checkout. We will make a start on that in the next tutorial.