You can add custom code to your .htaccess file in order to block a particular IP Address(s) but you can also use a firewall like that which is used by Cloudflare CDN. I’ll show you how to do both in this article.
Table of Contents:
- Why block IP Addresses?
- How to block an IP Address via Cloudflare CDN (easier)
- How to block an IP Address via .htaccess file (harder)
Why block IP Addresses?
An IP Address is a particular number which all website users will have that is specific to their location geographically and their particular internet connection. If you are receiving unwanted traffic from a particular IP Address, ie perhaps a hacker or other nefarious user, then you can block that particular IP Address so they can’t even browse your site.
For eg, let’s say you don’t do Business in Russia or Nigeria but you get a lot of spammy traffic from there. You could, via WordFence Plugin, find these Addresses and block them by following the rest of the instructions in this post.
How to block an IP Address via Cloudflare CDN (easier)
Once your WordPress site has been set up with a Cloudflare Account you can block IP Addresses very easily from the Cloudflare Dashboard.
If you haven’t set up Cloudflare yet and want to you can do so for free or watch the video tutorial below.
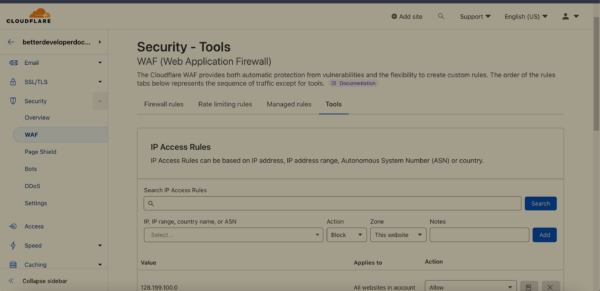
Once Cloudflare is set up you can simply navigate to the ‘Security Tab’ in the menu and then ‘WAF‘ and then ‘Tools‘. See screenshot below. Here you can add the IP Address and select from the options to execute the block.
How to block an IP Address via .htaccess file (harder)
Find the “IP Address”:
If you know the IP Address then you can move onto the next step.
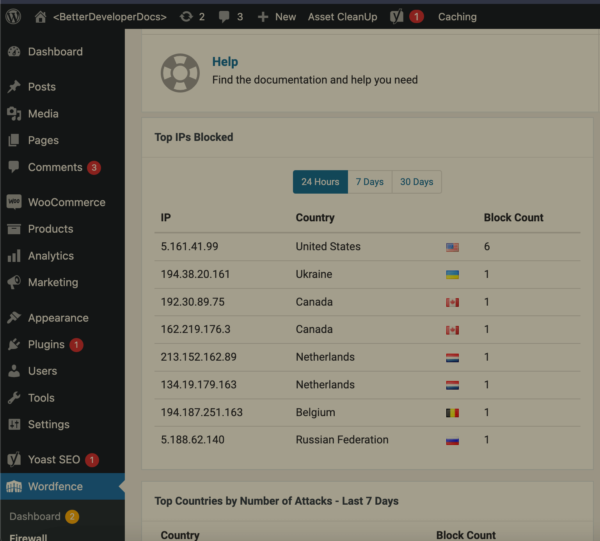
If you don’t already know it but you suspect you are getting a lot of unwanted traffic you can install WordFence (for free) WordFence Security Plugin which will automatically start to track which IP Addresses commonly access your site.
You can, in the dashboard of your site, view these and then move onto the next step to block them from your WordPress site.
Once installed and you give it some time (maybe 12-24 hours depending on your site) to track the users you can then view the IP Addresses which your site is viewed from by going here in your CMS, https://yoursite.com/wp-admin/admin.php?page=WordfenceWAF. This is the Firewall page of WordFence Dashboartd.
Add it to the .htaccess file
Copy the IP Address and then edit the below code to be that of the IP Address you want to block:
Deny from 123.123.123.123You can also block multiple IP Addresses at once by doing something like this,
Deny from 111.111.111.111 222.222.222.222 333.333.333.333You can add various other kinds of ‘blocks’ to .htaccess including blocking from a specific domain name as well as from a particular country. All can be added to the .htaccess file of your site in order to be implemented.
Add it to your .htaccess once you’ve finalized the code:
Your .htaccess file in WordPress is located on your server. You can edit .htaccess in multiple ways.
Once you’ve found out how to edit it simply add the code above to the top of your .htaccess, with your particular IP Addresses to block and save the file.
NOTE: Double check your site still loads correctly just in case you have made any errors. Errors in .htaccess can break your entire site so be careful.