
Assigning a domain to Bluehost is what you want to do if you want to manage more than one domain name and website from your one Bluehost account. You can do this from your Bluehost Dashboard by logging in and following the instructions in this article.
Watch along on You Tube
Before assigning a domain
To make sure you understand the wider environment or Bluehost account and hosting various domains let’s run through some things to check before we carry on with actually assigning a domain.
- You should already have an account with Bluehost.
- In addition this account should not be a ‘basic’ account as this would only allow you to manage one domain name. Assigning a domain name usually means we are managing multiple domain names and their respective websites from one Bluehost Account.
- Check here if you’d like to understand which account to upgrade to. I run through the various Bluehost accounts by budget and skill level here. Bluehost is is one of the most popular WordPress hosts int he world and has a fairly simple straight forward dashboard to run things from.
- You could also have already bought a domain name (but it’s not 100% necessary) like https://myawesomewebsite.com and now want to set it up on a host.
- I like to use NameCheap to buy my domain names as they are quite comprehensive and low cost.
Assigning the domain to your Bluehost Account
Now you are all set up with a Bluehost Account. You can have or have not have a Domain Name at this point.
Step 1:
Go to your Bluehost Dashboard and select ‘Domains’ from the left hand menu and then ‘Assign’ from the sub menu.
You will be presented with a screen like so.
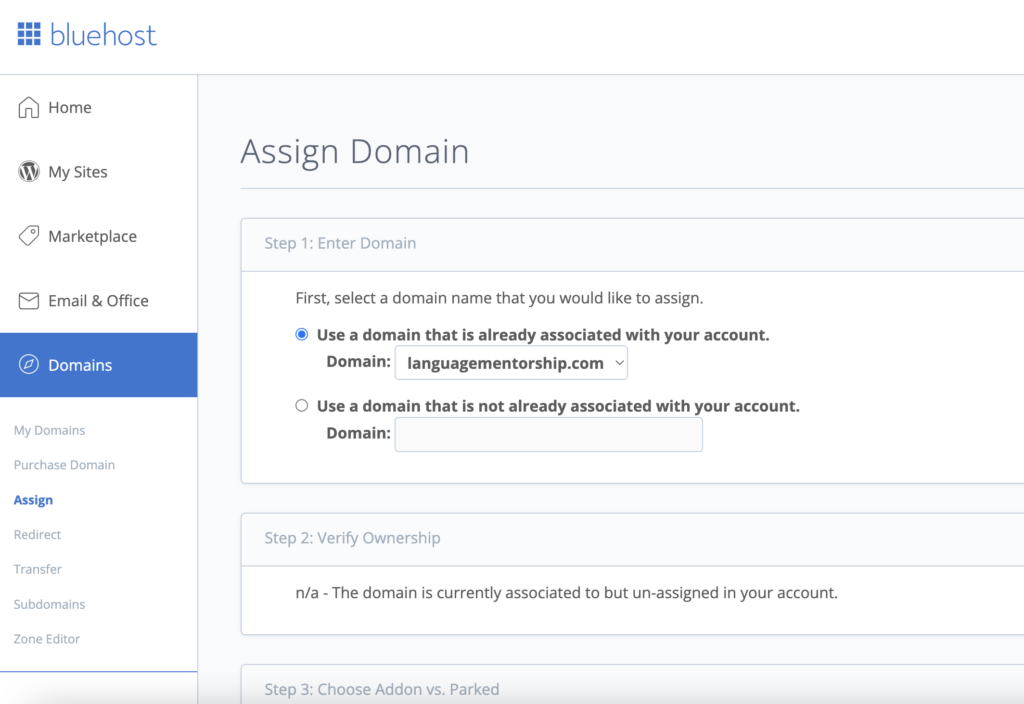
If you already associated the domain select the first option.
If you haven’t then select the second and you will be asked to point your domain to the Bluehost Name Servers.
You can do this by logging into the account where you bought your domain name (could be Bluehost as they also offer this service or could be another depending on your situation) and editing the Name Servers there.
PROTIP: The name servers are a set of Bluehost Server Names which the mechanics of domain names need to know in order to send users who enter your domain name to your particular WordPress installation on the Bluehost Server. If you don’t do this users will not be able to view your site in their browser. Name Servers are a bit like a postal address. If people didn’t know your address they would find it hard to send you mail or physically locate your house.
The Blue Host Name Servers are kept up to date here on their site but usually don’t change so they are presented here also.
| Bluehost Nameservers | |
| ns1.bluehost.com | 162.88.60.37 |
| ns2.bluehost.com | 162.88.61.37 |
If you don’t already have a domain name (eg yoursite.com) then,
- you can set up a sub-domain (also in the left hand menu under ‘Domains’)
- and later, once you have bought the domain name, come back to the ‘Assign’ tab and use the ‘Domain name not already associated with your account‘ option.
- From there you can, in the same ‘Assign‘ tab, select ‘add on domain‘ and then select the existing directory which houses your WordPress installation with which you created the WordPress site at.
- In this way you can set up a WordPress site without having the domain name yet, use a sub-domain to set up a WordPress site, and later use this process to assign your newly purchased domain name to the sub-domains directory.
Step 2:
Once the Domain Name has had its Name Server information sent to Bluehost you can move on and choose how you’d like to handle this particular domain name. You have a few options.
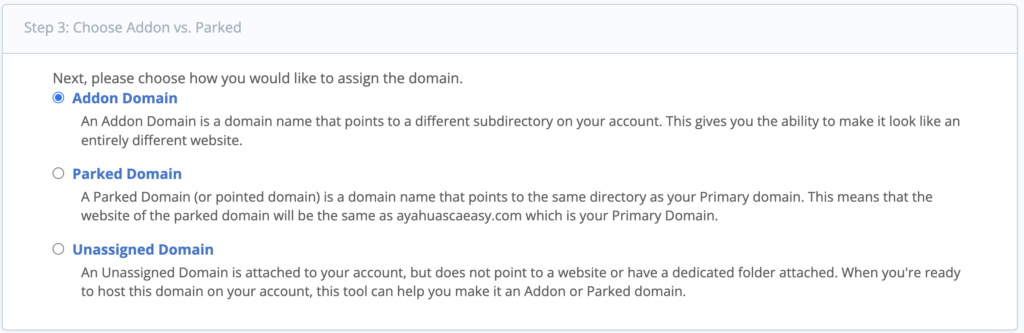
As the above image suggests you can choose to,
- Add On a Domain: Use this option if you want to set up a WordPress site that uses its own domain name, and is a separate website (database, theme, plugins etc) than any other site on your Bluehost Account.
- Park a domain: If you want the domain name to point to another website on your account select this option. For eg, you might have multiple domain names for the same business or website like https://yourwebsite.com and https://yourwebsite.net. Some people do this so that competitors can’t sneak in and start to copy their brand.
- Unassigned Domain: If you just want to point it here and have it ready for another time to set up your site then select this option.
Step 3:
Depending on the choice you made in step 2 you may or may not need to do this step. If you selected ‘Add on a domain’ then proceed otherwise you can just hit the ‘Assign this Domain’ button to finish the process.
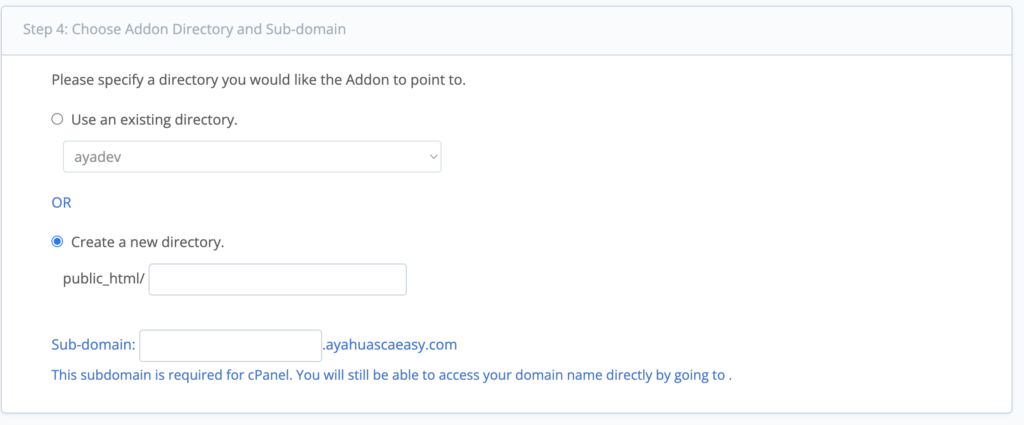
If you have selected ‘Add on Domain’ then you can now choose where you want to set up the site in terms of the specific directory on your server.
If there is a specific directory you want to point this domain to then select that one otherwise it will default to a standard directory name and create one when we save this page.
I usually do the later BUT if by chance you were working on a site which you had previously not assigned a domain name to then there may be an existing folder with which you want to point this domain to on your Bluehost server.
Once you’re done you can hit the ‘Assign this domain’ button and you are finished with assigning this domain. Congratulations!