First you’ll need to get the FTP account details from your hosting account and then use an FTP Client (Mozilla for eg or Sublime Code Editor) to utilize these details in order to connect via FTP (File Transfer Protocol) to your Host Server computer. I’ll show you how in this article.
(Update Dec 2022)
Table of Contents:
Get FTP Details from your hosting account
- Login to your hosting account
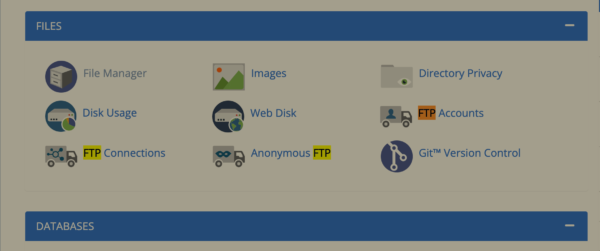
- navigate tot he cPanel. This could be in different places within your account depending on your particular host. If there is no link to cPanel try looking for ‘Advanced’.
- Once in the cPanel you will see an icon called ‘FTP Accounts’ or something similar.
You can now create a new FTP user and use those details to connect in the next steps.
NOTE: Some cPanels may not allow you to change the password to an existing FTP account so if so you can just create a new one.
You can create a new one with this form,
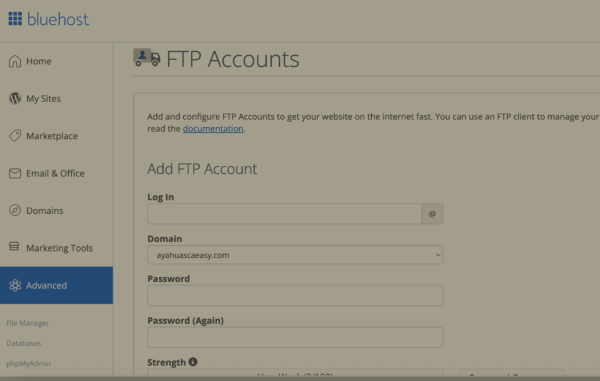
Make sure to note down two of the details with which you create. The username and the password.
NOTE:
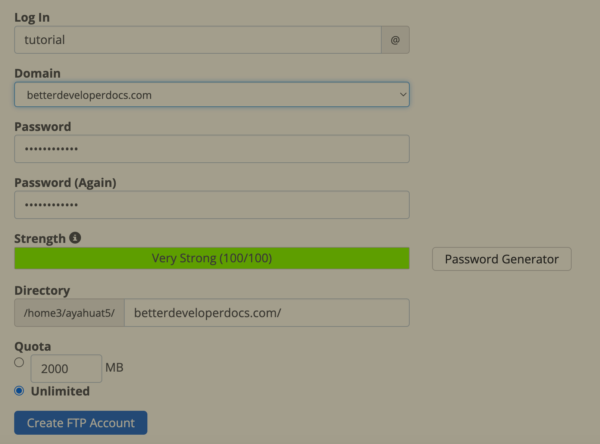
- Make sure to edit the directory path with which this account will be able to access. A normal FTP account will only have access to one specific folder in order to reduce the attack surface for hackers or the ability to cause bugs.
- Make sure the password is secure as you will not want others to be able to use this as it accesses your WordPress site files which are critical to your site working.
Download an FTP or IDE piece of software
You can now use these details to connect to your host account but you have to use these within a particular software. I’ll detail these now.
Filezilla:
Use Filezilla if you are simply downloading or transferring files and folders to or from the WordPress site.
Once downloaded and installed you can follow these instructions in order to connect to your site with the FTP details you gathered in the above steps.
Step 1:
- Once Filezilla is open go to the ‘Site Manager’ in the top menu.
- Select ‘New Site’
- You can now add a name for the site under ‘My Sites’ so you know which one you are connecting to next time as well as adding the username and password details you created above in your host account.
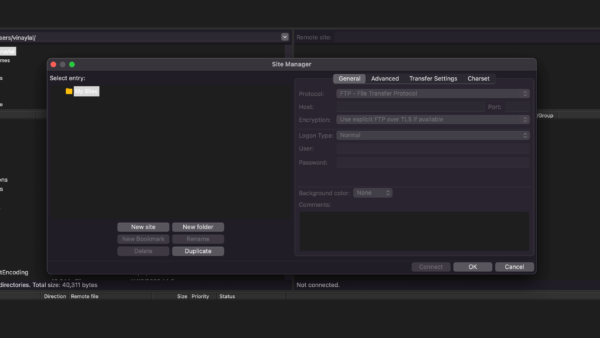
Step 2:
Enter your username and password into the appropriate fields.
Also set the:
- Host: That of your URL you are connecting to but could also be your IP Address for your server itself. Check with your host if the first doesn’t work. It should be accessible somewhere in your host account.
- Encrytpion Type: Explicit FTP over TLS. Sometimes this won’t work so I sometimes change to one of the other options if I am not able to connect.
- Port: Usually 21 but shop around if you’re having issues.
Step 3:
Hit the connect button and wait for the system to give you a success message. Once connected you will see the files with which you can access on the server in the right hand panel.
On the left hand panel you will see the files on your local system. these are not on the server but on your local computer.
Troubleshooting Filezilla connection issues:
Some alternatives which have worked for me in the past.
- Host: That of your URL you are connecting to but could also be your IP Address for your server itself. Check with your host if the first doesn’t work. It should be accessible somewhere in your host account.
- Encrytpion Type: Explicit FTP over TLS. Sometimes this won’t work so I sometimes change to one of the other options if I am not able to connect.
- Port: Usually 21 but shop around if you’re having issues. 1024 is another one.
- Not the folder you want to access? When you set up an account for FTP you generally need to set the folder with which the FTP Account can access. This is a security feature so people don’t have access to things they shouldn’t. If you are having difficulty accessing the files you creating go back and check the FTP User account in your host account and if you cant change the directory with which the FTP User has access to then create a new one that does. Delete the old one.
- There is also a ‘master’ FTP user crated when you create your hosting account (at least there is with Bluehost which is my host) and you can also use these details for the username and password (same ones as you login to your hosting account) in order to access ftp. This is good if you suspect your specific username and password which is often different than the master one could be at fault. Worth a try.
Sublime Text (IDE)
Use Sublime Text IDE if you want to edit files on your local computer and, upon saving them, upload your changes to the live (or test site) automatically. This is convenient for ongoing changes to the WordPress files in a theme or plugin for example.
PROTIP: You may have downloaded the WordPress site files (or just the theme) in the above step with Filezilla and now you want to set up that code to be a more permanent method of frequently altering the code in your site.
Once downloaded and installed you can set up a folder of code to, upon being saved in Sublime Text IDE, to automatically upload this to the WordPress site.
Step 1:
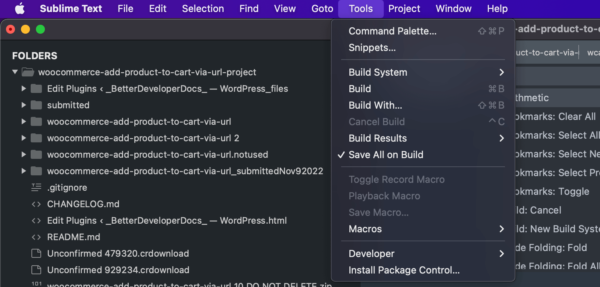
Open up the Sublime Editor. Go to the ‘Tools Menu’ and select ‘Install Package Control if you have already not done so. This allows you to install various functionality to Sublime such as FTP Mapping which we need in this case.
Step 2:
- Then hit ‘command’ + ‘fn’ + ‘p’ kets to bring up the Command Pallete for Sublime.
- Then search for ‘Package Install’. Wait a moment for a searhc panel to come up.
- When it does search for ‘SFTP’ and select it. This will install the functionality to use FTP to map your files to the server via the FTP details you created earlier.
- Wait a few seconds for it to download.
Step 3:
- Now go and right click on the folder with which you want to map to the server and you’ll see an ‘SFTP/FTP’ option under the list of all options.. For example, if you are working on a theme you could right click on the WordPress theme folder on your local computer. You’ll see something like the below.
- Select the SFTP/FTP Option.
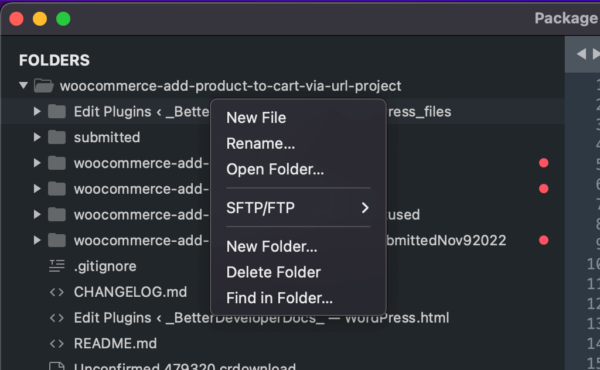
- Then select ‘Map to Remote’ and a file will appear for your to edit and save.
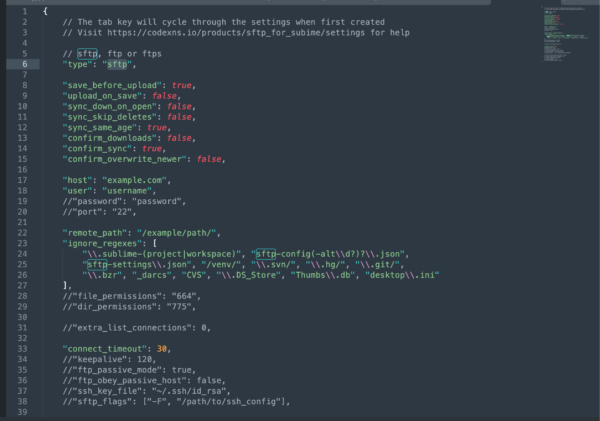
We are going to edit and save some of these details.
- “type”: “sftp”
- Select the option that works for you. I sometimes just use FTP but SFTP is safer.
- “upload_on_save”: false,
- You will need to change this to ‘true’
- “host”: “example.com”: Add your own host as per the details you created in the above steps.
- “user”: “username”: Add your own username as per the details you created in the above steps.
- //”password”: “password”: Uncomment this and add your own host as per the details you created in the above steps
- //”port”: “22”, Uncomment this and add your own host as per the details you created in the above steps
Troubleshooting Sublime text connection issues:
In the same way as trouble shooting your Filezilla connection issues you may have to play around with the various details here. See above section on troubleshooting Filezilla.
Next?
That’s it. Assuming your connection details are correct you should now be able to save the file on your local computer and have these changes automatically upload to your WordPress site.